Making your own delicious, authentic and meaningful jelly moon cake for the upcoming Mid-Autumn Festival will be the hobby and desire of many people. In this article, Websosanh.vn will guide you how to make delicious jelly mooncakes without separating layers and share some experiences on how to best make and preserve the cakes.
1. Instructions for making delicious, easy-to-make jelly mooncakes, guaranteed 100% success
Mentioned jelly moon cake People will immediately think of jelly cakes from the brands Givral, Hy Lam Mon or Savoryday… Because these are famous jelly cake brands that many people know every Mid-Autumn Festival.
With the simple, easy-to-follow recipes below, you will be able to make them yourself Mid-Autumn jelly cake Extremely beautiful and delicious from the first time. Especially with this recipe, your jelly mooncakes will be as delicious as Givral or Hy Lam Mon jelly mooncakes. Let’s get started!
1.1. How to make jelly mooncakes filled with green beans
First is the extremely familiar cake filling every Mid-Autumn Festival – green bean filling. If you are familiar with baked cakes and green bean cakes, then the recipe for moon cake flan below will definitely make you and your family fall in love.
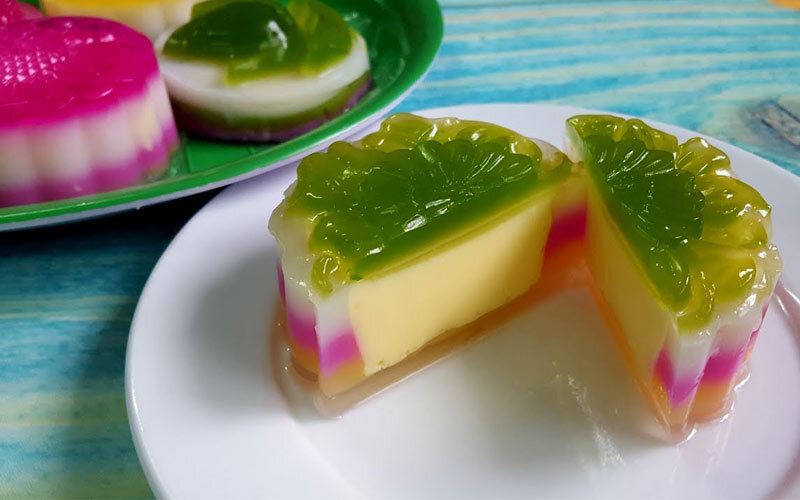
Delicious jelly cake filled with green beans for Mid-Autumn Festival
Flexible, crunchy jelly powder: 1 pack of each type.
Filtered water: 1 liter
Sugar: 180g
Green beans: 200g
Coconut milk: 200ml
Moon cake mold
Steps:
After fully preparing the above ingredients, follow the steps below.
Bean slug
Step 1: Soak green beans in cold water for about 3-4 hours to bloom, then put them in a pot with a little water and boil until the beans are completely soft.
Step 2: Put the beans in a blender to puree with 80g of sugar to form a smooth, homogeneous mixture.
Step 3: Pour the freshly ground bean mixture into the non-stick pan and start simmering over low heat, until the beans are soft and no longer stick to your hands.
Step 4: When the beans are still warm, take them out and roll them into even balls and then flatten them slightly, to a size smaller than the inside of the moon cake mold.
Cook jelly
Step 1: Use a clean pot, pour 500ml of filtered water.
Step 2: Mix ½ package of crispy jelly powder + ½ package of flexible jelly powder + 100g of sugar to create a homogeneous mixture, pour into a pot of water and heat over low heat. Cook while stirring gently to keep the powder from sticking to the pot.
Step 3: After boiling for about 3 minutes, add coconut milk to the pot of jelly, stir well to boil again and turn off the stove. If you want a flavor similar to Hy Lam Mon cake, you divide the jelly into several parts, add coffee, blueberry juice, pandan juice, and mango juice to each part.
Pour the cake
Step 1: Clean and dry the moon cake molds
Step 2: Scoop the water from the jelly and pour it into ⅓ of the cake mold to cool until the jelly is slightly frozen, then place the prepared green bean filling in the middle of the cake.
Step 3: Pour more jelly water to cover the entire filling and almost fill the cake mold. Wait for it to cool and put the cake in the refrigerator.
Finished products achieve:
After refrigeration for about 2-3 hours, the cake can be eaten. The cake will not be watery or deformed when taken out of the mold. The outside will be crispy and soft, melting in the mouth. The green bean kernel is fragrant, and when cut, the kernel and shell do not separate.
If you love salted egg green bean filling, you can add salted egg at the step of making the bean paste. However, to keep the salted eggs from being fishy, you should soak them in rice wine and steam them until they are completely cooked.
1.2. How to make cheese-filled jelly mooncakes
Another type of moon jelly cake filling that many people love is cheese filling. The method is quite simple, even if you have never done it before, you can easily do it the first time.
Mid-Autumn Festival jelly cake filled with fatty cheese
Ingredients to prepare:
Jelly powder: 1 package of soft jelly, ½ package of crunchy jelly.
When you have all the above ingredients, follow the steps below.
Step 1: Pour 100ml of milk and 3-4 pieces of Laughing Cow cheese into the pot, use a spoon to mash the cheese to mix it into the milk, use ¼ of the jelly packet to slowly pour into the milk to get a thick mixture.
Step 2: Use 500ml of water + ½ package of crispy jelly, ½ package of flexible jelly, boil with 100g of sugar, divide into bowls to mix color.
Step 3: Pour ⅓ of the jelly water into the mold and wait to cool down so that the jelly is slightly frozen, then pour ⅓ of the milk cheese mixture into the mold to cool, and finally add ⅓ of the jelly water to fill the cake mold.
Step 4: Wait for the cake to cool and gently place it in the refrigerator for 2-3 hours before it can be used.
Finished products achieve:
The finished cake will have a soft, crispy crust and a rich cheese filling inside. The cake does not separate layers and does not leak water when taken out of the mold.
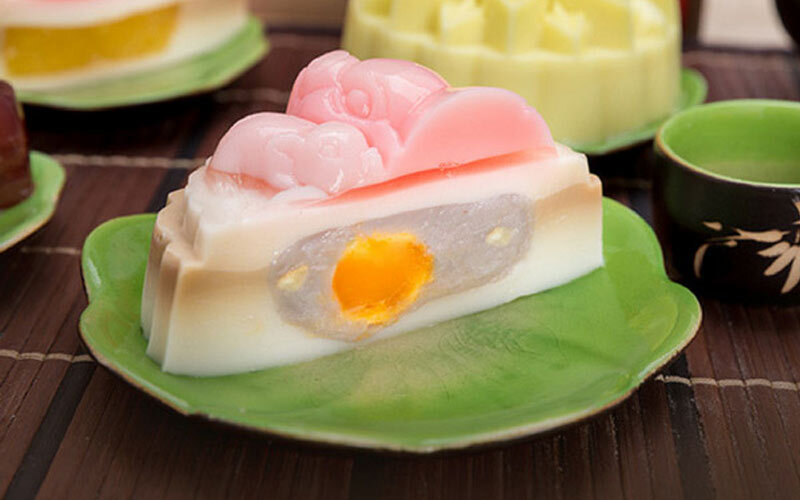
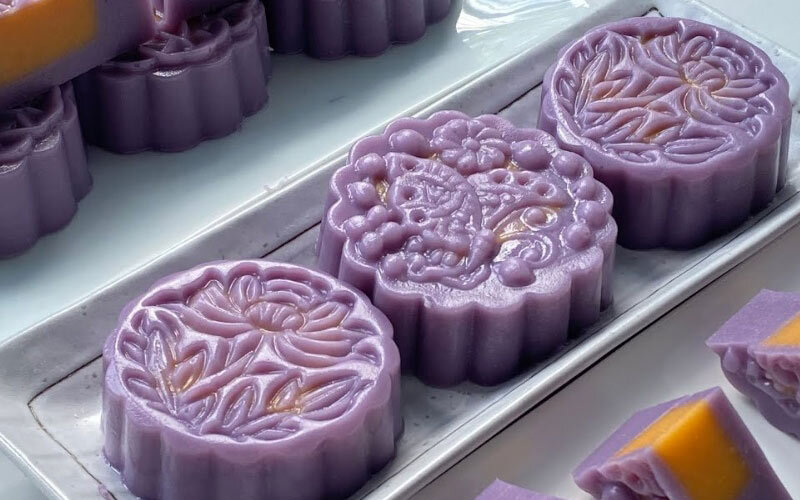
1.3. How to make jelly mooncakes filled with taro and salted eggs
Finally, the recipe for making salted egg taro mid-autumn jelly cake is super easy and the whole family will love it.
Mid-Autumn Festival jelly cake filled with taro and salted egg
Ingredients to prepare:
Taro: 300g
Jelly: ½ package
Crispy jelly: ½ pack
White sugar: 150g
Coconut milk: 100ml
Salted eggs: 5 eggs
Filtered water: 500ml
Moon cake mold
Steps:
Make cake filling
Step 1: Peel the taro, wash and steam. Then puree with 70g sugar.
Step 2: Soak salted eggs in wine to remove fishy taste, then steam until fully cooked.
Step 3: While the potatoes are still warm, divide them into small portions, put 1 salted egg in the middle, and gently knead the potatoes to cover the entire salted egg.
Cook the jelly and pour the cake
Step 1: Mix ½ package of soft jelly, 1/ package of crispy jelly and 80g of sugar, then slowly pour into a pot with 500ml of filtered water, boil over low heat and stir well until the jelly is completely dissolved. Add 100ml of coconut milk and stir until it boils again and turn off the heat. You can color it to your liking with vegetable juices.
Step 2: Pour ⅓ of the jelly into the mold and let it cool, put 1 salted egg taro filling in the middle, then pour in the remaining jelly to fill the remaining mold.
Step 3: Wait for the jelly to cool completely and store in the refrigerator for about 2-3 hours.
Finished products achieve:
The cake has a medium sweetness, crispy and soft on the outside, and a smooth, creamy taro filling with salted egg flavor on the inside. The kernel and shell are not separated and watery.
2. Share the best experience in making and preserving jelly mooncakes
2.1. Before and during baking
To make a delicious jelly cake for the Mid-Autumn Festival, each step has its own importance. Below are the experiences and notes before and while making cakes at home that you need to know.
Experience making delicious Mid-Autumn jelly cakes without separating layers
Baking ingredients must be safe and have a clear origin. Prioritize fresh ingredients to ensure the best flavor.
Baking tools need to be cleaned and sterilized before making.
Wash your hands thoroughly when making cakes.
Weigh and measure each ingredient’s weight and follow the recipe to achieve the sweetest, softest, and most delicious cake.
When boiling jelly water, keep an eye on the heat and stir continuously to avoid sticking to the pot.
After pouring the cake, absolutely do not shake or stir to avoid the cake from leaking water or separating layers.
The cake must be allowed to cool and slightly set before placing it in the refrigerator.
2.2. Preserve cake
Because the cake is homemade and does not use preservatives, you need to pay special attention to keep the cake as fresh as possible after making it. A few notes below that you can refer to and apply.
Cover and store the cake in an airtight container in the refrigerator, ensuring the temperature is always below 10 degrees.
To ensure the freshness of the cake when enjoying it, you should use it all within 3-4 days.
Can cost made jelly moon cake will be equal or better than cakes bought at the market. However, homemade cakes will be more meaningful to give to relatives, friends, and those you love during the most beautiful full moon of the year. Hopefully the above sharing will help you succeed with your Mid-Autumn jelly cake and enjoy a meaningful moon season with your family.


")